Creating Custom Bulletstyle
For this one we will use the Notepad++ or any code writing software and modify the "bullet.lua".
Activating 'Update THlib'[edit | edit source]
First, we should activate the "Update THlib" in the settings.
Go to the setting and click the "Update THlib before running" then click ok. (Make sure you have extracted the files to "data" in libary in LuaSTG_Ex and a folder named "data" in the root folder of data.zip)
This is very imortant, especially if your LuaSTG files are missing or currupted.
Creating a custom bullet style[edit | edit source]
Creating bullet styles are useful when you want a custom bullet styles for certain styles of danmaku like blinking arrowheads, rhombus gems and etc.
Most of the bullets in LuaSTG are defined as a object class as "img_class". The "img_class" class on the "bullet.lua" is where the image and the delay (defined as a mist before the actual bullet spawns) are located.
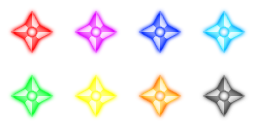
Examples of custom bullets are below this text:
Purpose[edit | edit source]
"img_class"[edit | edit source]
The "img_class" (class) defines the bullets image and the other parameters of an ordianay object.
"img_class.size"[edit | edit source]
The "img_class.size" (number) defines the bullets delay ['preimg'] size for the bullet.
"index"[edit | edit source]
The "index" defines the bullets color (number of images in the shot sheet). The ammount colours [images] here can be 8 or 16.
If the image count is 8 then the bullet image can be written as " self.img = [your image name resource]..int((index+1)/2) ",
and if the image count is 16 then the bullet image can be written as " self.img = [your image name resource]..index ".
Coding[edit | edit source]
So how do you write the code of the custom bullet?
First, we need to load the image that bullet style you needed.
LoadTexture('bullet_suriken','THlib\\bullet\\bullet_suriken.png')
LoadImageGroup('blade','bullet_suriken',0,0,64,64,4,2,5.5,5.5) --name, texture directory, x, y, image width, image hight, colums, rows, hcolli, vcolli
See API Manual to know what each function do above.
The "LoadImageGroup" function will be important here.
And find the size of each image. Each image in the sample has a width and hight of 64 pixels. It's better to know size of each image in each color of the spritesheet for the code.
And name it that you want to. (the name that I used is "blade" for easy writing) and copy the code above (or just write it) and replace any that you copied "arrow_big" to name that you want to which is blade.
--for 8 images in a sprite
blade=Class(img_class)
blade.size=0.8
function blade:init(index)
	self.angle=self.rot
	self.img='blade'..int((index+1)/2)
end
-- for 16 images in a sprite
gem=Class(img_class)
gem.size=0.415
function blade:init(index)
	self.angle=self.rot
	self.img='gem'..index
end
Don't forget to include it in the "BULLETSTYLE" list
and test it by writing the name of the bullet that you typed in the "bullet.lua" in the editor.
Kindly note that you need to modify the "NodeConfig.lua" and "LuaSTG Editor.xrc" of the editor and an image of a
bullet style (if you using legacy editor [.wx]) if you want the bullet to pop up in editor. It is better to note or memorize the name of custom bullet style, and if you can't modify the editor or you might break something...
S̵̴̵̴̷̸̸o̵̶̶̸̸̴̸r̵̵̶̸̸̵̸r̵̶̵̷̸̶̷y̸̶̵̷̴̵̵ ̵̵̵̶̶̷̶f̵̷̴̵̴̴̸o̴̸̷̶̶̶̴r̸̵̴̸̸̷̷ ̵̴̷̶̵̵̷s̴̴̶̴̴̴̴c̴̷̶̶̴̷̷a̴̴̴̴̵̶̷r̵̷̶̶̴̴̶c̶̸̶̴̶̷̴e̶̸̵̷̸̸̷ ̶̴̷̸̴̴̵i̸̵̸̶̸̵̶n̶̶̵̸̶̵̴f̵̶̵̷̷̴̷o̵̸̸̷̷̸̸ ̸̷̷̴̵̷̴b̴̴̸̴̸̶̴u̶̵̶̵̶̷̵t̵̶̸̴̶̶̷ ̷̴̸̴̵̸̶I̸̴̸̵̵̶̸ ̷̶̴̶̴̶̴t̷̷̸̸̶̵̸r̸̵̶̶̷̷̵i̷̶̸̵̴̷̵e̶̸̴̸̸̴̶d̴̶̷̸̴̵̵ ̵̸̵̷̴̵̸m̷̶̷̸̵̴̸y̸̴̸̷̶̵̵ ̴̴̷̷̵̶̷b̴̷̵̷̶̶̷e̶̴̵̶̶̴̴s̷̴̵̷̴̸̷t̴̸̷̸̴̷̸ ̷̶̴̶̵̴̸t̸̵̴̴̶̴̴o̷̶̵̸̸̷̸ ̵̵̶̷̵̴̷m̶̷̶̷̸̴̵a̴̶̵̴̴̸̵k̴̶̵̶̸̶̵e̴̴̴̴̸̴̷ ̷̸̷̶̷̴̵i̴̴̶̴̷̸̸t̵̸̶̷̶̵̵ ̴̴̵̷̴̴̶u̷̷̸̴̵̴̴n̷̸̴̵̸̷̵d̴̴̵̴̴̸̸e̷̵̶̴̸̶̷r̴̷̷̶̷̵̵s̷̴̸̵̵̶̵t̸̷̶̸̷̶̴a̵̷̸̸̸̸̶n̶̶̷̸̴̴̸d̷̸̵̴̴̷̸a̶̴̷̸̵̸̴b̶̷̷̷̶̶̴l̶̴̷̵̶̶̶e̵̶̷̸̴̷̸.̷̴̶̵̸̸̸
