Tutorial 2 ~ Images and Backgrounds (Editor) (Legacy)
Part 1 - Loading Images and Making Backgrounds[edit | edit source]
Welcome back! Now, we'll see how to load images and do boss backgrounds, and see how to change a stage background (not make them, that's more advanced. What this means is choosing a background from the pre-packaged ones).
First of all, I'd recommend you to create a folder to store all the files of your project, this is to have a better organization and to not make the editor confusing.
How about we start giving our boss a new face? First, we'll need a boss sprite.
Download this boss sprite, we'll use it as an example (don't worry, it's safe): Download Link
After you download it, extract the image (.png) into the folder you created on your PC.
After that, go to the Editor and select the Define Boss node already present on the management field, the go to the Image parameter and open the sprite file we just got, and then it'll automatically detect the borders of the image and it'll work inside the game! Open it up and you'll see Marisa flying on your screen. Also, for aesthetic purposes, you can change the display name to Marisa Kirisame if you want. Changing the type name will change how you call that boss on the editor, and if you change it, you have to change the name of it also on the stage group (e.g, you change the type name to boss_Marisa, then on Create Boss you'll have to change to boss_Marisa aswell).
This is one form of loading image, but directly instead of using the Load Image node.
How about we try this other way, then?
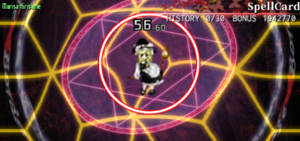
First, we need to know what we're doing first (obviously). Let's try... hmm... A background for the spellcards of our boss!
Download these files so we have an example: Download Link
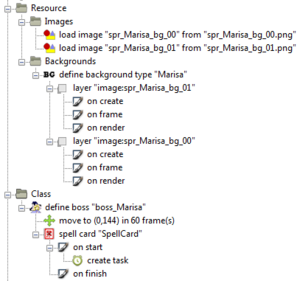
After you download them, create a new folder as a child of the Resources folder in the Editor, let's name it "Images".
Next, go to the Graphics tab and click on the Load Image node (![]() ) and put it inside the Images folder. Then, a window pop-up will appear, then select the files you downloaded and put them there. Repeat the process until you have all images inside that folder.
) and put it inside the Images folder. Then, a window pop-up will appear, then select the files you downloaded and put them there. Repeat the process until you have all images inside that folder.
After that, create another folder as a child of the Resources folder, name it "Backgrounds". Then, go to the Boss tab and select the Define Boss's Background node (![]() ) and put it inside that folder. A pop-up will ask for you to name the background. Let's name it "Marisa".
) and put it inside that folder. A pop-up will ask for you to name the background. Let's name it "Marisa".
Then, click on the node next to it, the Layer node (![]() ) and put it as a child of the Define Boss's Background node. A pop-up will appear for you to select the image you want to use. Click on the Image:spr_Marisa_bg_00 and use it.
) and put it as a child of the Define Boss's Background node. A pop-up will appear for you to select the image you want to use. Click on the Image:spr_Marisa_bg_00 and use it.
Next, you make another layer on top of the one already existing, and select the other image. Here, we'll need to make some alterations to the parameter of the layer.
Set the Is Tile parameter to True, this'll make the image sort of like a collage of itself but infinite. Usually seamless images are used with this because they don't have any notable differences on the sides of the image, so it "loops".
Set the vy parameter to 1.5, so that the image is always going up. If you want, you can change these values so that it fits your tastes. Then, set the hscale and vscale both to 0.7. After that, you're done!
Go to the Boss Define you used earlier and change the parameter Spell Card Background to the one we just created. then you'll be done!
Now, you learned how to load images. In future tutorials, we'll see more about where we can use them. For now, let's pause here.
Part 2 - Stage Backgrounds[edit | edit source]
It's pretty simple to change the stage background, but not to make them.
To change the stage background, go to the end of the stage node, usually inside the Class folder. There, we'll find the Set Stage Background node, click it, then click on the arrow on the parameter menu to select the pre-existing backgrounds. Test them and see which fits you better! The default one is "temple".
Now, creating a new background is a totally different story. That isn't inside these basic tutorials, but rather the advanced ones, so I won't cover them here mainly because they aren't able to made within the editor, but only with code.
Overlook[edit | edit source]
Overall, today we learned about loading images and creating backgrounds for bosses, and how to change a stage background.
See you next time!
| |||||||||||||||||


