Tutorial 3 ~ Images, Textures, and Visuals
Introduction[edit | edit source]
Hey, welcome back to another tutorial. This time, we're tackling what you see in the title — images, textures and visuals —, how to use them, being more direct.
Anyway, back on our project, you may see a folder (![]() ) named Resource. Select that, and let's go to the General tab and add another folder inside of the selected one (as a child) and name it "Images". This way, every image we add in the editor we can put it inside there. Now, the reason as to why do this? Well, let's try changing some things of our boss, shall we? Anyway, I have prepared a pack of images you can use as a base to learn how to change some things of our boss. You can download those things here and here.
) named Resource. Select that, and let's go to the General tab and add another folder inside of the selected one (as a child) and name it "Images". This way, every image we add in the editor we can put it inside there. Now, the reason as to why do this? Well, let's try changing some things of our boss, shall we? Anyway, I have prepared a pack of images you can use as a base to learn how to change some things of our boss. You can download those things here and here.
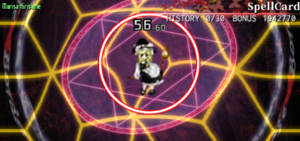
As you can see, these files you've just downloaded are images of a Marisa and a background for the spell card. Now, let me teach you a bit on how to change these things.
I suggest that you create a folder named "images" as well inside of the folder you're saving your project, and put the things you downloaded there, for convenience.
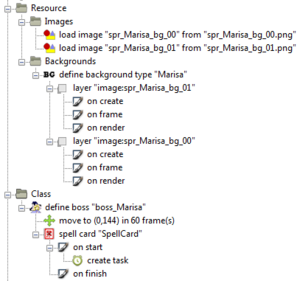
Anyway, you can load/insert every image inside of the editor by going to the Graphics tab, and clicking the "Load Image" (![]() ) node and selecting the images you want to load. Do not load the boss sprite, though (spr_Marisa_boss).
) node and selecting the images you want to load. Do not load the boss sprite, though (spr_Marisa_boss).
On these Load Image nodes you inserted, you can see settings on their node parameters menu, but don't do anything there. Also, for every thing that you want to change it's graphics, or creating an object, or changing a bullet's sprite, you have to load the images you're going to use for those, so keep this in mind. You can also instead of using the Load Image node, utilize the "Load Animation" node, if it's an animated image, or the "Load Texture" node, if it's for a wrapped/seamless image. Alternatively, use the "Load Image Group" node, if it's many images inside of one file, although I do not recommend using this.
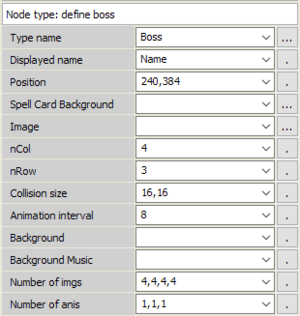
Finally, let's change our boss — select the Boss Define load already inside the management field. This is where all of the graphics, settings, and general behavior of the boss is, well, defined. As you can you can see in the image on the side, there are many things you can alter here.
| Parameters | Usage |
|---|---|
| Type name | The boss' ID name (I.e. boss_Marisa) |
| Displayed name | The name to be displayed in-game (i.e. Marsia Kirisame) |
| Position | The coordinates the boss will spawn at |
| Spell Card Background | That background that will be used when the boss activates their spell cards |
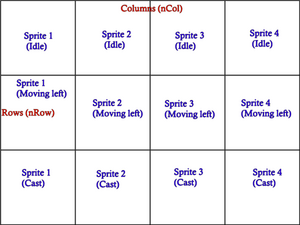
| Image | The boss' sprite sheet |
| nCol | The number of columns in the boss' sprite sheet |
| nRow | The number of rows in the boss' sprite sheet |
| Collision size | The size of the boss' hit box for bullets/player, first value is the X and the other Y |
| Animation interval | The number of frames before the sprite updates to the next sprite in its current animation |
| Background | The background that will be used for this boss during spell practice |
| Background music | The background music played during spell practice |
| Number of imgs | The number of sprites on the boss' sprite sheet |
| Number of anis | The number of animations on the sprite sheet (in the example on the lower right, it is the number of rows: 3) |
Anyway, let's put in the type name "boss_Marisa" (don't forget to change the "create boss" (![]() ) node in the stage portion so that it detects our boss), so we can refer to this boss as Marisa. To display the name we want for this boss in-game (in this example: Marisa Kirisame) we will write the boss' name in the displayed name box. On image, you can open the Marisa sprite sheet you downloaded. Now, you can debug the game and see if everything's working well.
) node in the stage portion so that it detects our boss), so we can refer to this boss as Marisa. To display the name we want for this boss in-game (in this example: Marisa Kirisame) we will write the boss' name in the displayed name box. On image, you can open the Marisa sprite sheet you downloaded. Now, you can debug the game and see if everything's working well.
Now, how about the spell card background? Let's change that!
Let's start simple: Remember the two images you downloaded before? Now's the time to use them.
Go back to the Resource folder, and you can create a new folder inside of it called "Backgrounds". Here is where we will store the backgrounds for the spell cards. Once you're done with that, go to the Boss tab, and insert the define boss's background (![]() ) node. let's give it the name "Marisa" for now. Now this is the part where you'll use those images we've just talked about.
) node. let's give it the name "Marisa" for now. Now this is the part where you'll use those images we've just talked about.
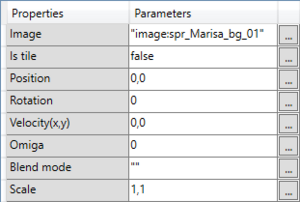
The spell card backgrounds are divided into layers, these layers can have some effects and even some different functions, but for now, we'll stick with the basics. I want you to select the node you just created and add it as a child of the "layer" (![]() ) node, located in the same Boss tab. After that, a box will pop-up and ask you what image you're going to use. Select "spr_Marisa_bg_01". Do this again for "spr_Marisa_bg_00". This way, "01" will be on top of "00", which is what we want. Select the layer with "01", and go the node parameters menu. There, you can see another list of settings.
) node, located in the same Boss tab. After that, a box will pop-up and ask you what image you're going to use. Select "spr_Marisa_bg_01". Do this again for "spr_Marisa_bg_00". This way, "01" will be on top of "00", which is what we want. Select the layer with "01", and go the node parameters menu. There, you can see another list of settings.
| Parameters | Usage |
|---|---|
| Image | The image that will be presented on this layer |
| Is tile | If the image should repeat itself on the edges |
| X | The horizontal position |
| Y | The vertical position |
| Rot | The angle it will be facing |
| Vx | The horizontal speed. Positive goes to the right, negative to the left |
| Vy | The vertical speed. Positive goes up, negative goes down |
| Omiga | The rotation speed. Positive goes clockwise, negative goes counter-clockwise |
| Blend mode | The blend mode of the layers (affects other images) |
| Hscale | The horizontal scale of the image |
| Vscale | The vertical scale of the image |
After you selected "01", let's define that it is tiled, and that the Vy is 2.
After this, you can go back to the boss define and write the name of the background you just created, and debug it.
Overlook[edit | edit source]
You're learning bit after bit on how to use this editor, aren't you? Make sure to revise the concepts and be sure that you understood the process on how to do these. Soon, I'm going to do some exercises for you to practice a bit of your knowledge. Stay tuned!
| |||||||||||||||||
